Measure Sound Better
How to Choose Microphone Size
In acoustic measurement, “microphone size” (1 inch, 1/2 inch, 1/4 inch, 1/8 inch) is not a cosmetic choice. It directly drives three practical limits of your measurement chain:
- How high you can measure in frequency (upper bandwidth)
- How much sound pressure you can survive without overload (max SPL)
- Whether low-level signals are still measurable (sensitivity and self-noise)
This blog summarizes the typical characteristics of each size and provides a field-ready selection workflow.
Why does size change performance?
Measurement microphones are essentially capacitive diaphragm systems.
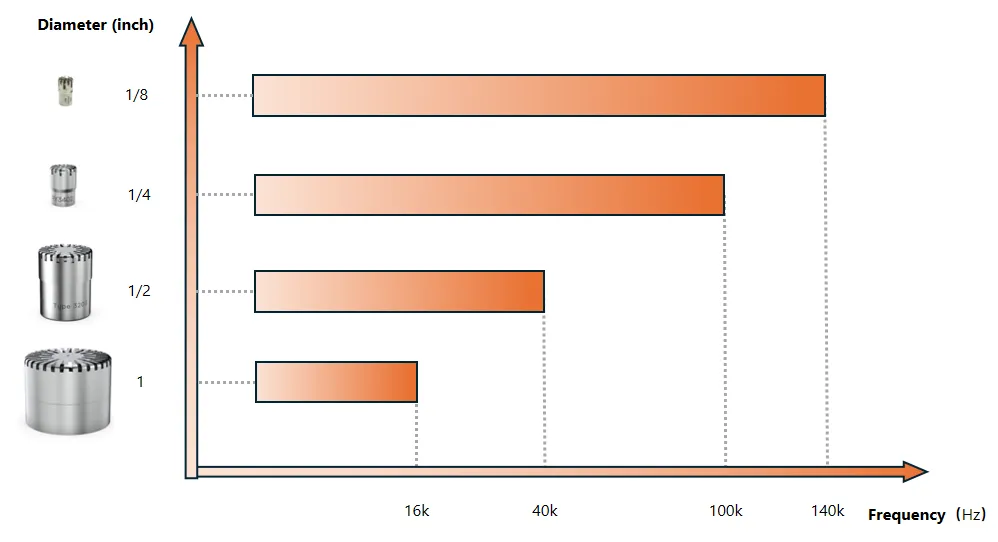
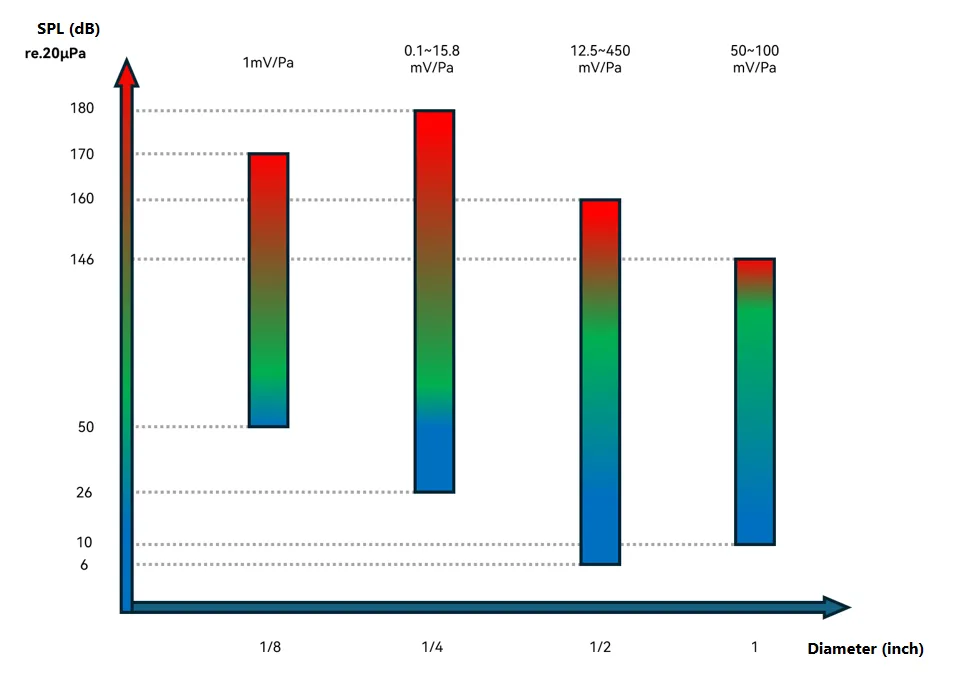
As the diaphragm diameter increases, a given sound pressure produces a larger charge variation, which typically results in higher sensitivity and lower equivalent noise. However, a larger diaphragm also causes greater sound-wave reflection on the diaphragm surface, leading to increased interference and an earlier roll-off of the high-frequency free-field response.
Conversely, smaller-diameter diaphragms make it easier to achieve a higher upper frequency limit and are less prone to overload at high sound pressure levels, but this comes at the expense of reduced sensitivity and signal-to-noise ratio.
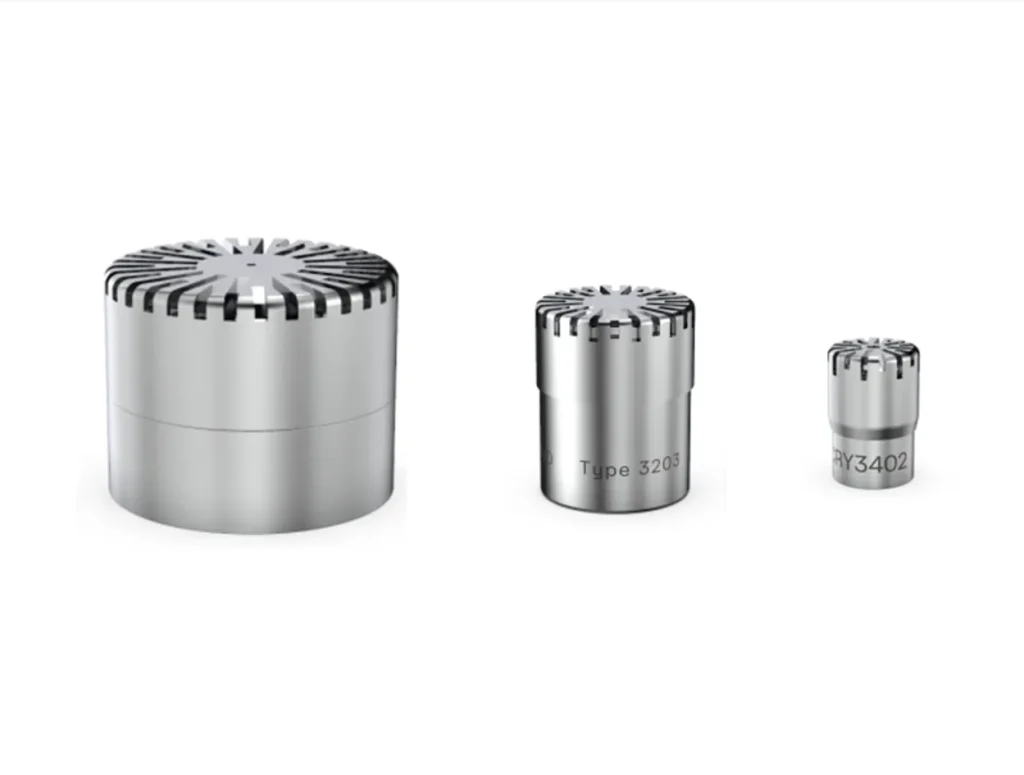
Typical profiles of four common sizes
The ranges below are typical industry trends. Always confirm with the datasheet and the calibration certificate of your exact model.
1 inch: best for low noise and low frequency
Choose 1-inch when the priority is capturing very low-level signals and maintaining robust low-frequency performance. Higher sensitivity relaxes front-end gain requirements and improves the system noise floor. The trade-off is size, accessory availability, and limited benefit for high-frequency measurements.
1/2 inch: the engineering sweet spot
1/2-inch is the workhorse size. It offers a well-balanced combination of bandwidth, sensitivity, max SPL, and the richest ecosystem of calibrators, preamps, and fixtures. For most NVH, sound power, building acoustics, noise measurement, electroacoustic testing, and acoustic signature monitoring applications, a 1/2-inch microphone is recommended as the first choice.
1/4 inch: higher SPL and lower flow disturbance
When measurement locations are space-constrained (such as inside ducts, cavities, or narrow structures) or when sound pressure levels are very high (e.g., near nozzles, valves, or in the near field of airflow noise), 1/4-inch microphones are more suitable. Their smaller diaphragms provide greater resistance to overload and reduced disturbance to the sound field.
The trade-off is lower sensitivity and a relatively higher noise floor, making them unsuitable for extremely low-level sound measurements.
1/8 inch: Extremely confined spaces
1/8-inch microphones are typically used for two types of “extreme requirements”:ultra-high upper frequency limits, and extremely confined spaces.
Due to their very small installation size and relatively high noise floor, they are not intended for general-purpose measurements, but rather for specialized applications.
A practical selection workflow
Step 1 – Define bandwidth
- Determine the highest frequency
Step 2 – Define SPL range
- Estimate the maximum SPL while also considering the minimum measurable sound level (noise floor), and allow a margin of 4–6 dB.
Step 3 – Define field and installation constraints
- Free-field, pressure-field, and diffuse-field conditions affect calibration; spatial constraints and flow conditions determine whether a smaller microphone size is required.
Step 4 – Check environment and durability
- High temperature, extreme cold, water splashes, and dust can affect long-term stability; when required, special microphones such as the CRY3213 NVH measurement microphone with an IP67-rated waterproof and dustproof design should be selected.
Quick recommendations by application
Environmental Noise / Building Acoustics / Sound Power / Electroacoustics / Acoustic Metrology:
1/2″ (general-purpose, low noise, easy calibration)
Automotive NVH (interior, engine compartment, vehicle road noise):
Primarily 1/2″; 1/4″ for high-SPL near-field measurement points
High-SPL Near-Field Applications (nozzles, valves, exhaust outlets) / Aerospace Engine Noise / Blast Noise:
1/4″ (depending on SPL and frequency bandwidth)
Confined Spaces / Cavities / Ducts / Array Measurements:
1/4″ or 1/8″ (balancing size and performance)
Wind Tunnel / Aerodynamic Noise:
1/4″ or 1/8″ (lower flow disturbance and higher resistance to airflow)
Conclusion:
If you are uncertain, starting with a 1/2″ microphone is the safest and most versatile choice. When higher frequency limits, higher SPL capability, smaller spaces, or reduced flow disturbance become the dominant requirements, consider 1/4″ or 1/8″ microphones. When ultra-low noise performance and superior low-frequency response are the primary objectives, a 1″ microphone should be considered.
For extreme environmental and operating conditions, such as extreme cold, high temperatures, water splashes, or dusty environments, special microphones like the CRY3213 IP67-rated waterproof and dustproof measurement microphone are recommended.
You are welcome to learn more about microphone functions and hardware solutions on our website and use the “Get in touch” form to contact the CRYSOUND team.